Understanding Vapor Barrier Installation
Moisture control is critical in maintaining the health and longevity of a home. One effective way to prevent dampness and ensure a dry environment is through Vapor Barrier Installation, a process that safeguards areas like crawl spaces and basements from moisture intrusion. This comprehensive guide will delve into the purpose and benefits of vapor barriers, the types available, and how to choose the right material for your specific installation needs.
Purpose and Benefits of Vapor Barriers
Vapor barriers are crucial in safeguarding a structure from moisture-related problems. Their primary purpose is to prevent moisture from the ground from penetrating into living spaces, which can lead to mold growth, structural damage, and health concerns. Key benefits include:
- Moisture Control: By blocking moisture, they help maintain optimal humidity levels.
- Mold Prevention: Reducing moisture levels hampers mold and mildew growth.
- Energy Efficiency: A well-installed vapor barrier can improve energy efficiency by aiding insulation performance.
- Structural Integrity: Protects foundational elements of the home by keeping them dry.
Types of Vapor Barriers Available
Various types of vapor barriers are available, each suited for specific environments and applications:
- Plastic Sheeting: This is the most common type of vapor barrier, typically made from polyethylene, available in various thicknesses.
- Foil Barriers: Often used in conjunction with insulation, foil barriers reflect heat and resist moisture.
- Spray-On Barriers: These liquid applications provide a seamless barrier and are ideal for irregular surfaces.
Choosing the Right Material
When selecting a vapor barrier, consider these factors:
- Thickness: Common thicknesses range from 6 to 20 mils; heavier materials provide better durability.
- Material Composition: Polyethylene is standard, but consider foil or spray solutions depending on your needs.
- Environmental Considerations: Areas prone to high humidity may need more robust solutions.
Preparing for Vapor Barrier Installation
Assessing Your Space
Before beginning installation, it’s essential to assess the specific area where the vapor barrier will be installed. Inspect for existing moisture issues, the condition of the soil (if installing in a crawl space), and other factors like ventilation. Make sure the environment is conducive to installation.
Necessary Tools and Materials
Equipping yourself with the right tools and materials is crucial for a successful installation:
- Materials: Vapor barrier rolls, seam tape, and possibly insulation materials.
- Tools: Utility knife, measuring tape, stapler or adhesive, and safety gear (gloves and mask).
Cleaning and Drying Your Crawl Space
Before the installation, clean the crawl space thoroughly. Remove debris and ensure there’s no standing water. It’s helpful to use a dehumidifier to dry the area fully. This step is vital as moisture can undermine the effectiveness of your vapor barrier.
Step-by-Step Vapor Barrier Installation Process
Measuring and Cutting the Vapor Barrier
To begin, measure the dimensions of the area where the vapor barrier will be placed. Cut the vapor barrier material to size, leaving a little excess to ensure full coverage. This is particularly important in irregular shapes or hard-to-reach areas.
Installing the Barrier in Different Environments
Installation processes may vary based on where the vapor barrier is being placed:
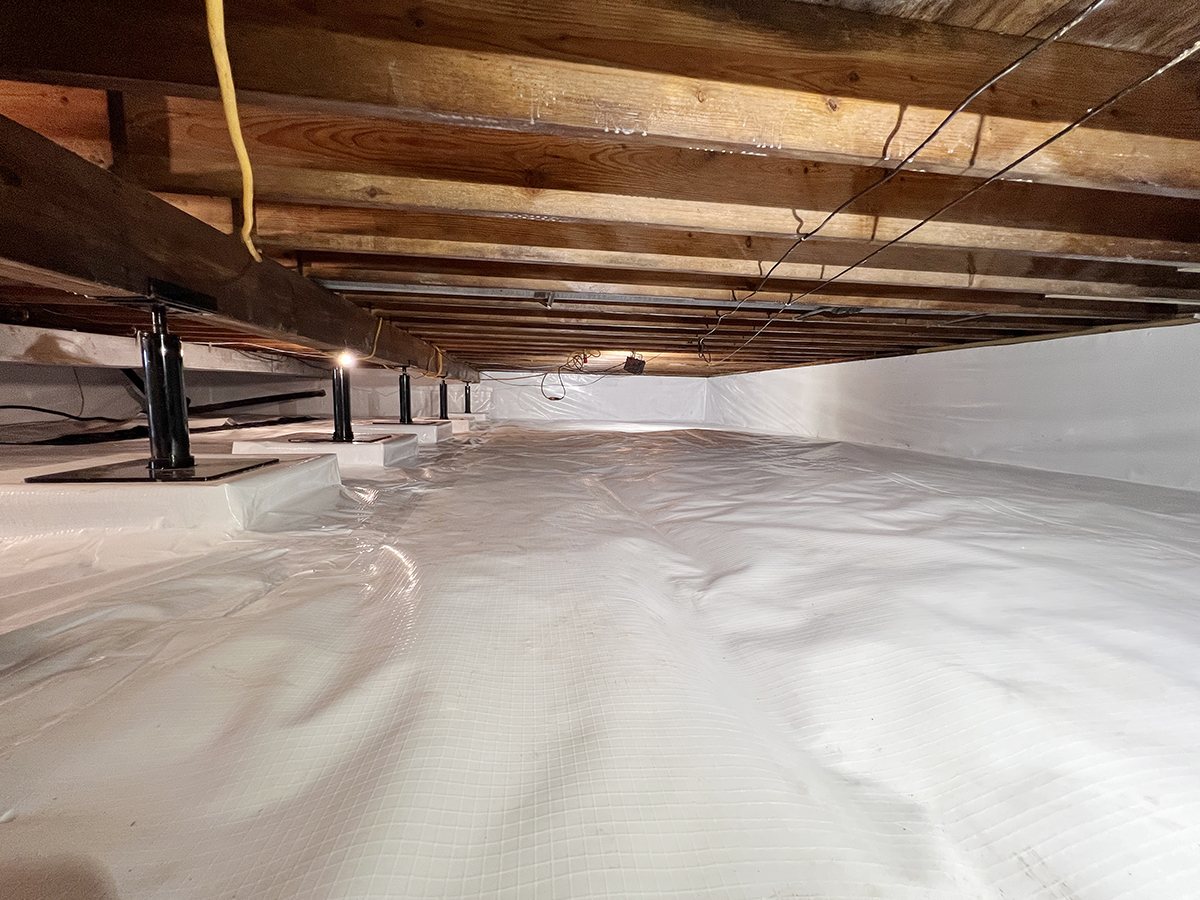
- Crawl Space: Roll out the barrier and overlap seams. Ensure it extends up the walls for optimal protection.
- Basements: Install the barrier on walls or floors, securing it with tape or adhesive.
- Under Concrete Slabs: Layer beneath concrete for moisture control, ensuring proper sealing at the edges.
Sealing and Securing the Barrier
Once the vapor barrier is in place, it’s crucial to seal all overlaps with appropriate seam tape. Ensure that all edges are secured against walls or soil to inhibit moisture penetration. Regular inspections will help maintain its functionality over time.
Common Challenges and How to Overcome Them
Dealing with Uneven Surfaces
Uneven surfaces can create gaps where moisture can enter. Use additional materials to level surfaces or apply sealant in uneven areas before installation.
Addressing Moisture Issues
If moisture issues are present before installation, it’s essential to address these first. Consider adding drainage solutions or waterproofing methods before laying down your vapor barrier.
Tips for a Seamless Installation
To ensure a smooth installation, work with a partner for large areas, double-check measurements for accuracy, and allow the barrier to relax before securing it.
Frequently Asked Questions about Vapor Barrier Installation
What is the best type of vapor barrier material?
Material choice often depends on the environment; polyethylene sheeting is a popular option for its durability and efficiency in moisture control.
Can I install a vapor barrier myself?
Yes, many homeowners can install vapor barriers by following detailed guides, ensuring they have the correct tools and materials for safety and effectiveness.
How do I maintain my vapor barrier after installation?
Regular inspections for tears and damage, coupled with monitoring moisture levels in the area, are essential for ensuring your vapor barrier remains effective.
Is vapor barrier installation necessary in all crawl spaces?
Not all crawl spaces require a vapor barrier; however, it is highly recommended in areas prone to moisture to prevent problems associated with humidity.
How do I know if my vapor barrier is installed correctly?
Signs of correct installation include tight seals, no visible gaps, and uniform application across all affected surfaces, ensuring comprehensive moisture protection.